 Using Trunk Club to Update My Spring/Summer Wardrobe
 5 Tips For Styling a Simple Summer Dress
 5 Ways to Style a Bandana
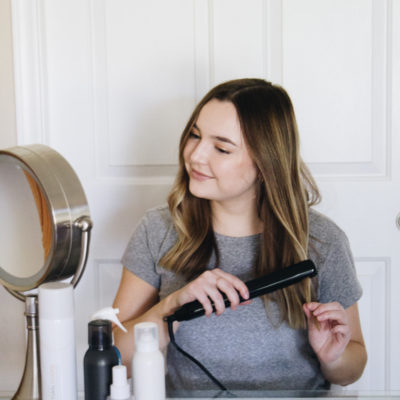 3 Different Ways to Curl Your Hair
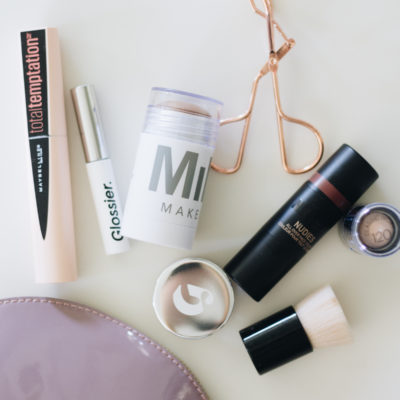 How to Master the 5-Minute Makeup Routine
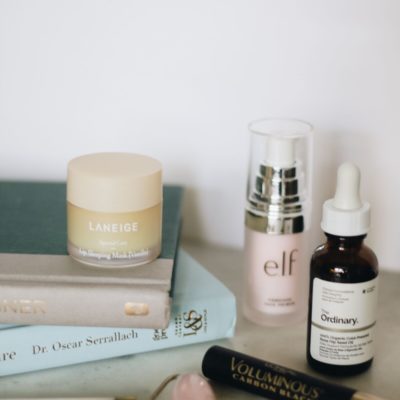 Amazon Beauty Buys Under $25
 3 Ways to Make Your next Trip More Memorable
 Tips for Digital Spring Cleaning and Organizing
 Color Trend: Marigold
 Mental Health Update: The 3 Major Changes I Made to Get Out of Depression
 5 Unexpected Ways to Unwind After Work
 How to Know You’re in a Controlling Relationship
 4 Questions I get Asked as a Professional Resume Writer
 How to Make Friends at Work
 Getting Out of the ‘Busy’ Mindset
 Ask Amanda: How do I pursue the career I want without formal training?
 Ask Amanda: How Do I Find a Therapist?
 Ask Amanda: How do I stop being jealous in my relationship?

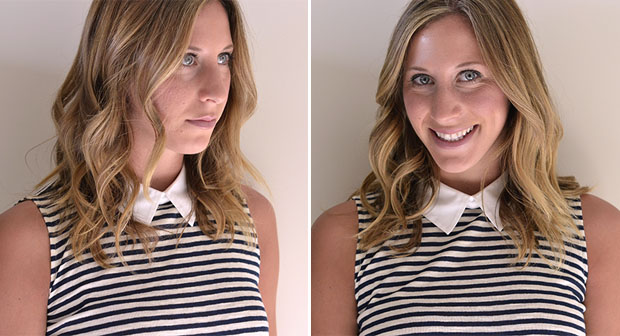
While there are tons of hair tutorials out there on different ways to curl your hair, one small detail that always seems to be missing is how to actually use the curling iron. For example, the way you hold the curling iron and which way you turn it is very important when curling your hair. And it’s not as intuitive as you may have thought.
First things first, make sure you have a curling iron you love, including the right curling iron for your hair length. Ceramic curling irons help reduce frizz, some people prefer wands to irons, and this one is a tried and true classic that won’t break the bank.
Follow this guide below to create classic, natural looking waves. I’m using a 1 1/4 inch curling iron for this tutorial.
Start by separating your hair into 2 sections. If you have super thick hair then you may end up doing 3 layers.
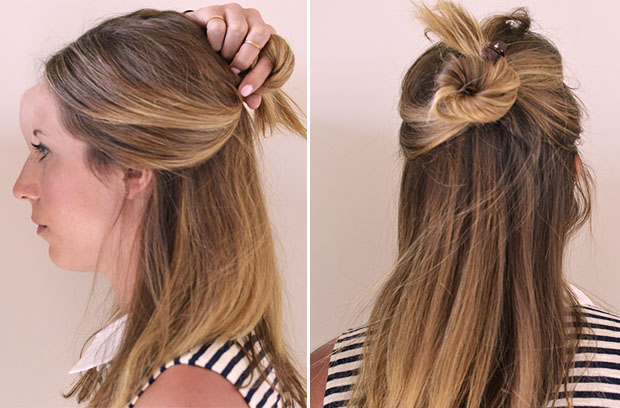
How to Use a Curling Iron
Option 1:
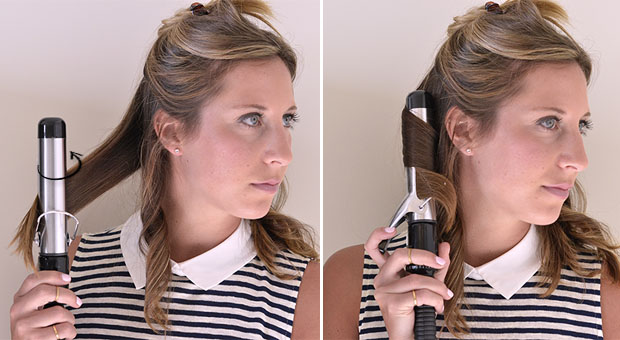
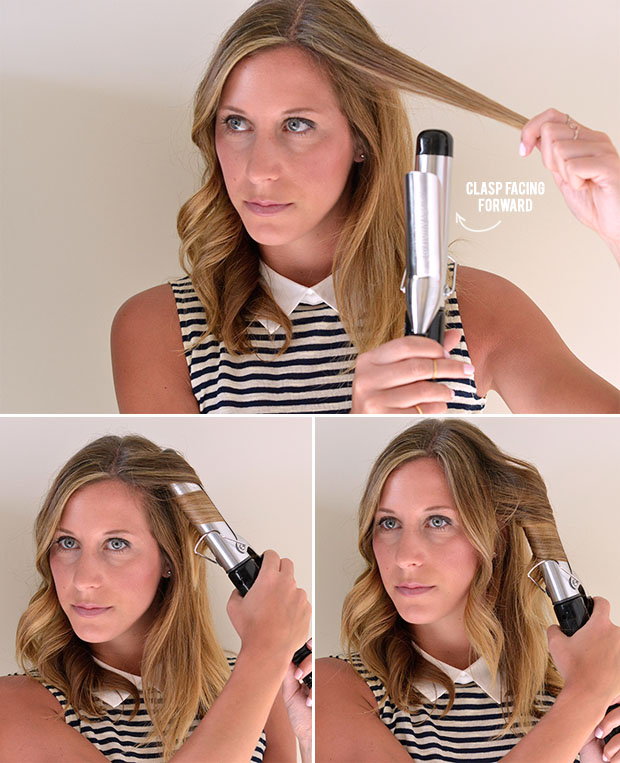
Start by holding the curling iron vertically with the clasp facing forward. Then clamp a 2 inch section of hair about 1-2 inches from the ends. Curl the hair out and away from your face, all the way up to the root. Hold for 7-12 seconds depending on your hair texture. Always curl the front pieces away from your face (unless you’re going for a retro Hollywood vibe).
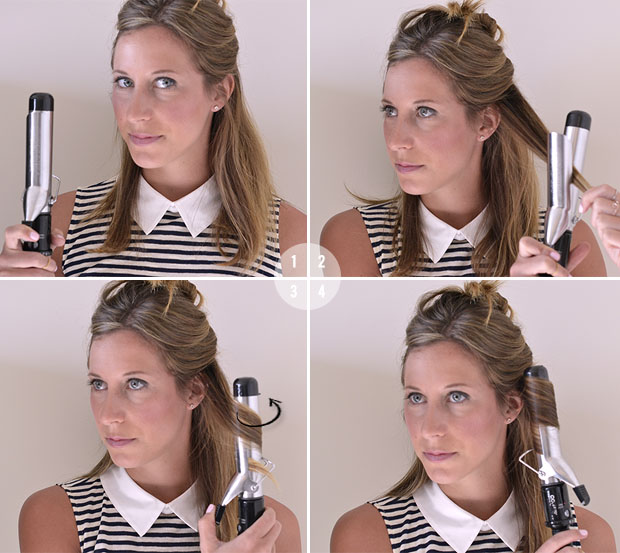
Option 2:
If you have super thick hair, this is a better option for you. Again, hold the curling iron vertically with the clasp facing forward. Then clasp a 2-inch section of hair about halfway up. Twirl the curling iron out and away from your face so that you are just curling the roots. Hold for about 7 seconds then gently release the clasp just slightly and slide the curling iron down to about 1-2 inches from the ends. Now curl the section of hair all the way to the roots and hold for another 7 seconds.
The result of either option should look like this:
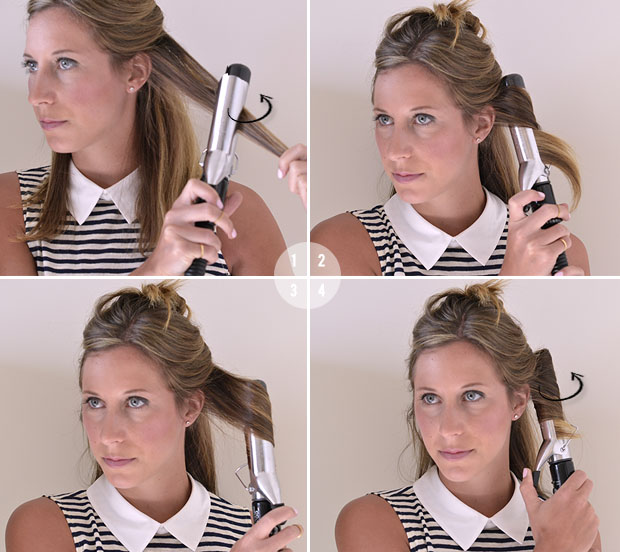
Once you’ve done the front pieces, I like to switch up the direction of the curl to create a really natural look. This time, hold the iron vertically but with the clasp facing the opposite direction. Clasp the hair about 1-2 inches from the ends and twist the iron in and towards your head, up to the roots. Hold for 7-12 seconds then slowly release the clasp. You can also use option 2 above, just be sure to twist the iron towards your head for an inward curl.
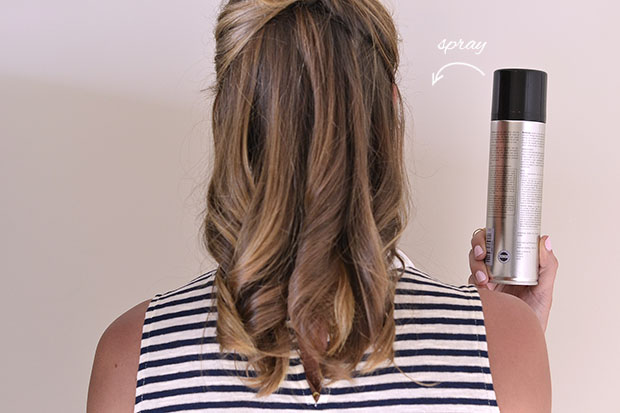
Now spray the bottom layer with hairspray. Then let down the next layer.
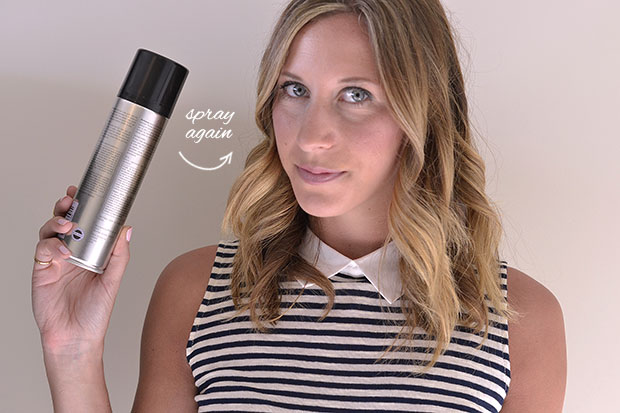
Once you get to the top layer, again be sure to curl the few front pieces out and away from your face. For the 2 pieces in the very front, on either side of your face, I like to use “option 1” because these sections shouldn’t be as curly as the others. I also hold the iron in the curl for less time, about 5-7 seconds, for a looser effect.
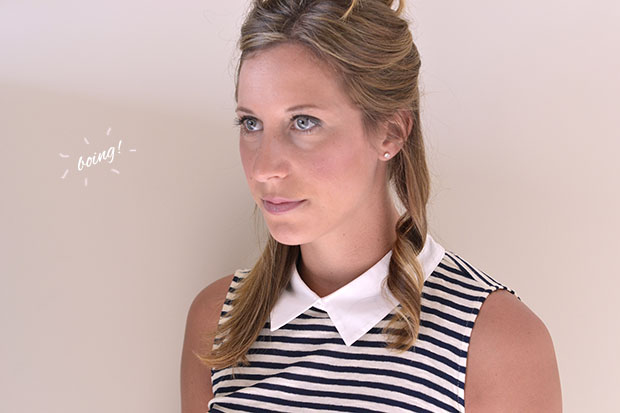
Again, spray your whole head with hair spray.
Now gently flip your hair forward then back and rake your fingers through it to get rid of the structured ringlets.
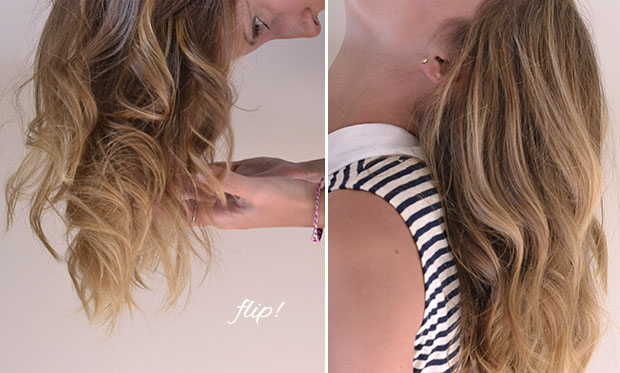
Ta-da!

Does this help you master the curling iron?
Kelly Says
Thanks so much for posting this! I have naturally curly hair, so I’ve never used a curling iron before. Sometimes I wish I could ‘reshape’ parts of my messy look, and I think I’ll definitely try this out the next time I need to fix my hair!
Amanda Says
Post authorI’m so glad that was helpful! Using it to touch up your natural curls is a great idea. I do the same with my wavy hair!
Madeline Says
Thanks for the tips ! My hair is so hard to curl but I’m going to try your tips next time. Your hair is gorgeous !
Alyssa Says
So pretty! My strategy is pretty similar to yours, except I use a clipless curing iron. Also, your shirt is adorable!
Mel Stevens Says
awesome awesome awesome! I’m gonna go grab my karmin g3 clipless!!! thanx a lot
vivien Says
Thanks for the awesome tutorial! I’m trying this with my Karmin clipless, it’s professional.
Chrissa Reed Says
Thanks so much for this article! I’ve been wanting to get a curling iron for some time but have been a bit unsure about what to do! So this is definitely a big help :)
Bethany Simpkins Says
Where did you get your shirt? I must have one!
Monique Says
thank u for the tips, very nice, I will try that with my karmin g3 clipless, it’s very similar to a wand and makes awsm curls . :)
Lianna Says
this is great! I always get frustrated and give up. I bought hot rollers but i don’t like the curl as much lol
<3 Lianna J @ Salem Style Crochet
Gena Says
Love this hairstyle! So sweet!
xo
Blush and Blossoms
wow Says
Thanks for your good infomation~~~~^.^ helpful!
NYCE Says
i want to know how to use my curling iron., and now that i know, i can make my hair curly, thanks for the teps!
LAUREN Says
Great article! really appreciate the step by step pix too. What brand / model curling iron did you use?
Helen Says
Brilliant! Finally a tutorial I can make sense of! The pictures help especially! Thanks :)
Jen Says
So cute! I have the same length hair, and sooo excited to try this! I was really depressed today- and this actually cheered me up some. Hope my hair turns out as pretty as yours! Just got a new curling iron, same size too :)
Amanda Says
Post authorI’m glad this cheered you up! Hope you have a great weekend!!
vithi Says
i would like to know the curling kit, because i got one kit but the curls goes within 5 mins i would like to know the best kit to use and the brand of the hairspray
Allyson Says
Try Aussie or Tresemme. That’s what I use. It stays all day with those.
vithi Says
i would like to know the curling kit, because i got one kit but the curls goes within 5 mins i would like to know the best kit to use and the brand of the hairspray, pls send ur reply to my mail id vithiya.devi4@gmail.com
Pingback: Everyday Beauty – Gray Hair And Mastering That Damn Curling Iron! | Dot to Trot
http://pdx.daddyforever.com/ Says
Howdy just wanted to give you a quick heads up.
The words inn your content seem to be running off the screen
in Firefox. I’m not sure if this is a format issue or something
to do with web browser compatibility but I thought I’d post to let
you know. The layout look great though! Hope you geet
the issue solvved soon. Cheers
Mila Says
Amazing tutorial, thanks for your effort to make these detailed pictures. Your curls look so natural!
Pingback: The Latest Long Curly Hair For Teens | Long Hairstyles and Cuts
Heather Says
Thank you so much, I’m a total curling iron handicap. I have not curled my hair since I was 15 and am now 37. Your tutorial was more helpful than watching you tube. I sat @the table with my iron not plugged in and practiced and now it totally makes sense. May I ask you why my ends came out looking weird what did I do wrong.
David Says
Is there a website that makes it easy to follow blogs and podcasts? I don’t have an iPod, does that matter?.
Alexandra Says
What kind of hairspray do you use? I’ve seen many “before heat sprays” on the Internet. They are like protective against heat. I’m wondering if these are just a marketing fluke…
Pingback: How To Use a Curling Wand
Marcy Says
Thanks for sharing these tips with such clear photographs. You have lovely hair.
Janice Says
Thank you so much for showing this! I always try curling my hair and it always ends up very messy because I don’t know what I’m doing. You’ve really helped me though! So happy I found your site, especially as I have summer ball this week. You’ve completely saved me as I have no money to get my hair done, so thank you! :)
SHINODA Says
Thanks for your tips. It’s very useful for me. I’m using curling wand but it’s not suitalbe for me. I’ll try use curling iron with your advice.
P/S: I love your hair :) so nice!
Guru Says
Thank you for your review and I’m gonna go grab my karmin g3 clipless!!!
O Says
Great tutorial, thank you!
Rose Says
How do you avoid getting obnoxious crimps and bends in your hair from the clamp? Also, my hair is super hard to curl. If I want even a little curl I have to hold it around the iron for at least 45 seconds. Any advice?
Allyson Says
She probably wraps the hair away from the clip, rather than over it. And the time may have to do with the thickness of your hair. But don’t worry! Everyone’s hair is made differently.
Pingback: 21 Extremely Useful Curling Iron Tricks Everyone Should KnowThe NEW N!FYmag
Pingback: buzzookas.com Shot that buzz! – Extremely Useful Curling Iron Tricks Everyone Should Know
Pingback: Useful Curling Iron Tricks Everyone Should Know | WORLD Warotter
Pingback: 21 Truques incrivelmente úteis para quem usa Babyliss | SOS Solteiros
Pingback: 21 Extremely Useful Curling Iron Tricks Everyone Should Know - Fashion & Beauty Ideas
Pingback: 21 Extremely Useful Curling Iron Tricks Everyone Should Know - Heidi's Hair Design
Roya Says
Part of my hesitation with curling my hair is that the effort seems wasted as soon as I shower, which is usually daily especially if I’m working out. How often do you curl your hair/is it worth the effort if you’re just going to shower later? This also works the reverse way, ie, if I’ve curled my hair, I won’t go work out :-/
Amanda Says
Post authorGood question! I still find that it’s worth it because I’ve found a way to curl my hair quickly. I totally understand if it takes you more than 30 minutes, you wouldn’t want to go through all that effort. I recommend practicing so that it becomes very comfortable and easy for you to do. You also don’t need to do your entire head if you have some natural curls. You can just do a few pieces on the top layer to touch it up! Hope this helps :).
Pingback: Der ultimative Lockenstab-Guide: die besten Tipps, Tricks und Stylingideen - schrittanleitungen.de
ana Says
Thank you so much! I’m definitely going to try this out. I have thick “curly” hair I’ve always struggled with the curling iron, I have a curling wand but i have so much hair it gets really frustrating having to hold the hair and wand in place without getting burned.
Kaitlyn Says
Wow! I was curling my hair while following these tips and it actually worked! I never got curls before but after trying what you said? Well, I think it’s about time to go talk to my crush ;)
Pingback: 21 Curling Iron Tricks – angelashaircare
Pingback: How To Use Curling Iron? – Everyday Chic Fashion Blog
Pingback: Amazing awesome tips on best curling wand for waves – Wonderfulsharing on the World
Pingback: Very cool tips on wanding hair
Pingback: Amazing great tips on small barrel curling iron – Amazing World
Pingback: Curling Iron Techniques: How to Use a Curling Iron for Thick Hair - Curling Diva
Pingback: Extremely unique tips on how to curl hair without a curling iron | Bored animal
Pingback: Highly outstanding tips on big curling iron | THEBLUEB
Pingback: Quite awesome tips on different types of curling irons | Chun Bot
Pingback: Really stunning tips on how to curl long hair with a wand | Amazing Place Tip
Pingback: Highly genuine tips on curled long hair | Boredzebra
Jo Beck Says
Please recommend a i” curling iron that’s easy to use and not easy to burn yourself on! So many confusion reviews out there.
Pingback: Diva Beach Curls Wand Tutorial | Advance Game
Nicole Hall Says
I’m so glad you wrote this!!! I’ve been trying to learn how to “curl hair” but what i really meant was to learn how to use the curling iron.
Pingback: How To Use a Curling Wand - Hairstyles for girls in 2017
Trang Says
Finally, the best curling hair tutorial on the internet belongs to you. I’ve read and watched hundreds of tutorials, but there’s always something missing, such as how to hold to curling iron, where to clip hair etc.
For me, a written tutorial is the best, as I can’t visualize how to really maneuver the iron just by looking at a video.
Thank you so much.
Lorrie Headrick Says
Thank you! I have curly hair but my daughter has stick straight. I needed the basics and you provided like a pro! Thanks girl…
Karoline Says
I never ever leave blog comments, but I just had to say THANK YOU! I have very fine, very straight hair that always slips out of my hands when I try to use my curling iron as a wand. I didn’t like using the clamp because I couldn’t figure out how to work it without making a huge crease in my hair. I followed your method, and it made my hair curl so beautifully AND it didn’t take all morning! Thank you, thank you, THANK YOU!
emmaackermann Says
Hey nice tips you shared. If don’t have time for a lengthy blow dry, and you don’t want your hair to look unruly, a hair straightener is the best option to create truly flattering styles.
Zoe Says
So when you release the hair from the iron, should you unroll it first or will that mess it up?
Amanda Holstein Says
Post authorDon’t unroll it, just loosen the clasp on the iron and let the hair fall out! :)
Best Curling Iron Says
Last night i bought curling iron from Amazon and i am new to use thanks your article help me how can we use
Pingback: How to Restyle Your Old Wig Back To Life (Follow These Tips!)
Pingback: 3 Ways to Use a Curling Iron
Irina Says
Best I have ever used is the Karmin.
Pingback: Curling Iron Techniques: How to Use a Curling Iron for Thick Hair – Curling Diva
Pingback: Looking for the best curling iron for thick hair? – Curling Diva
best curling iron for short hair Says
nice thread. I’d like to see how it could be possible to use curling iron for short hair. For example using these curling irons – https://greathaircurlers.com/best-curling-iron-short-hair/
lash factory Says
i like your post! that’s very wonderful!
thanks!
Beautebar Says
Great article. Thanks for sharing it.
Anaya Says
I am a lover to make curls with my hair and thanks Admin to make such nice information about a curling iron
test.com Says
It permits you to check your web site using well-liked instruments like pagespeed and YSlow.
Netherlands Stories Says
I am from Netherlands I am looking the best curling iron in my country that’s great opportunity now i am happy to get best Curling iron
rania Says
I appreciate the fantastic tutorial. I’m testing this out with my professional Karmin clipless.