 Using Trunk Club to Update My Spring/Summer Wardrobe
 5 Tips For Styling a Simple Summer Dress
 5 Ways to Style a Bandana
 3 Different Ways to Curl Your Hair
 How to Master the 5-Minute Makeup Routine
 Amazon Beauty Buys Under $25
 3 Ways to Make Your next Trip More Memorable
 Tips for Digital Spring Cleaning and Organizing
 Color Trend: Marigold
 Mental Health Update: The 3 Major Changes I Made to Get Out of Depression
 5 Unexpected Ways to Unwind After Work
 How to Know You’re in a Controlling Relationship
 4 Questions I get Asked as a Professional Resume Writer
 How to Make Friends at Work
 Getting Out of the ‘Busy’ Mindset
 Ask Amanda: How do I pursue the career I want without formal training?
 Ask Amanda: How Do I Find a Therapist?
 Ask Amanda: How do I stop being jealous in my relationship?

Blogging 101: How to Edit Photos for Instagram
posted on May 19, 2015 | by Amanda Holstein

Anytime I see a post on this topic, I must admit, I always click on it. I’m so curious to see how other people edit their photos on their phone, for Instagram and the like. So today I’ll spill and give you the low down on how I edit mine!
First, let’s talk about why Instagram is so important for your blog. As visual people who are creating photo-heavy blogs, it’s important to extend your brand onto relevant channels. Instagram, in my opinion, is the most relevant channel for lifestyle bloggers. It’s where your readers spend most of their time, where you can find new readers, and where you can show a more day-to-day or behind-the-scenes look at your life. People want to know about you. Who is the person behind the blog? So leveraging Instagram as a tool to connect with your readers is a smart move. We can definitely talk more about how to make the most out of Instagram, but today let’s focus on the photos.
Before you do anything else, the most important things you need to do to edit photos on iPhones (and other smartphones) is this: download AfterLight and NEVER touch the Instagram filters!
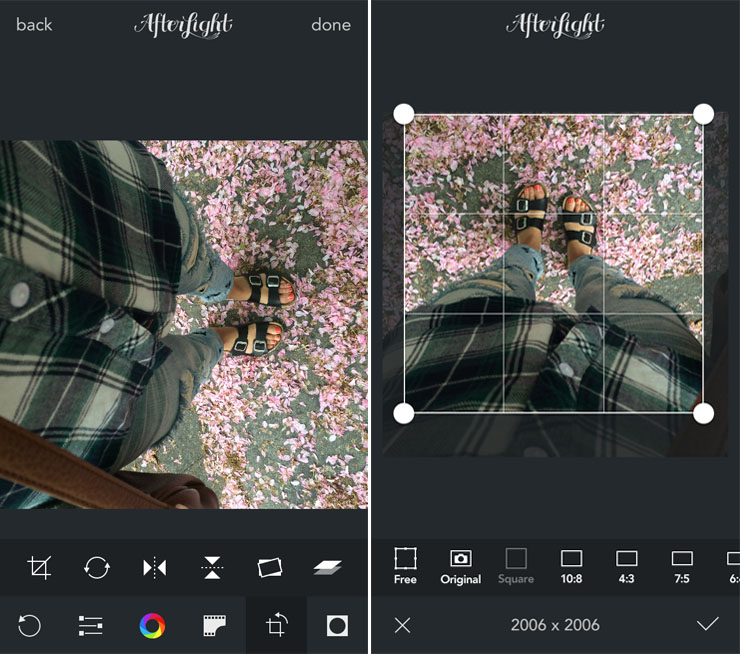
Step 1: Upload & Crop
I always start by cropping the photo first so I can really see what I’m working with. Use the “square” crop so it’s all ready for Instagram. Play around with different compositions. I like to edit a few different cropped versions of the photo to see what I like in the end.
Step 2: Brightness & Contrast
Next, start with brightening the photo and upping the contrast. I like mine super bright, but I’ll start with just a little brightening at first since you can always go back and add more.

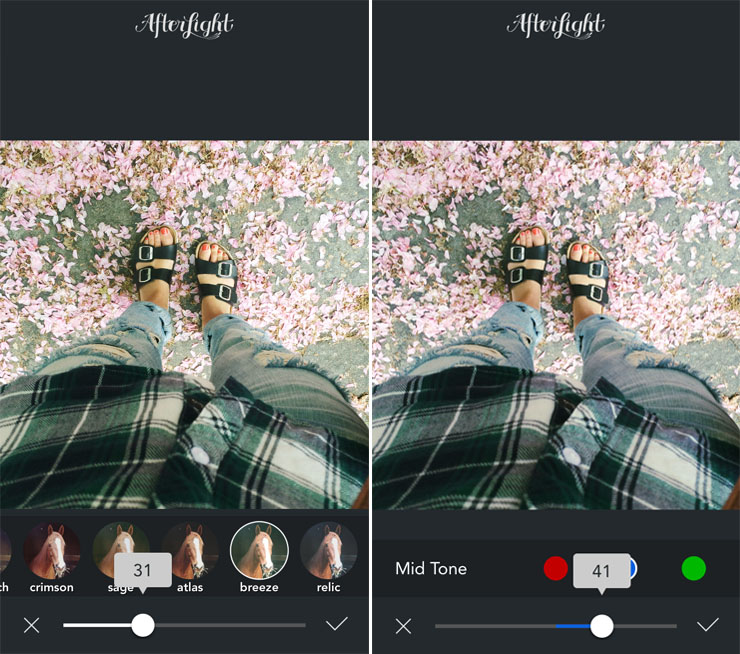
Step 3: Filters & Mid Tones
I think the key to a cohesive Instagram profile is to have a go-to look to your photos. This is where you create that look. I found a filter that I like to use on all of my photos – Breeze. It tends to go a bit too green, so I’ll increase the blue colors under Mid Tones. I love that you can adjust how much of the filter you want. I always suggest using the filter to enhance your photo, and even look like you didn’t edit it at all.
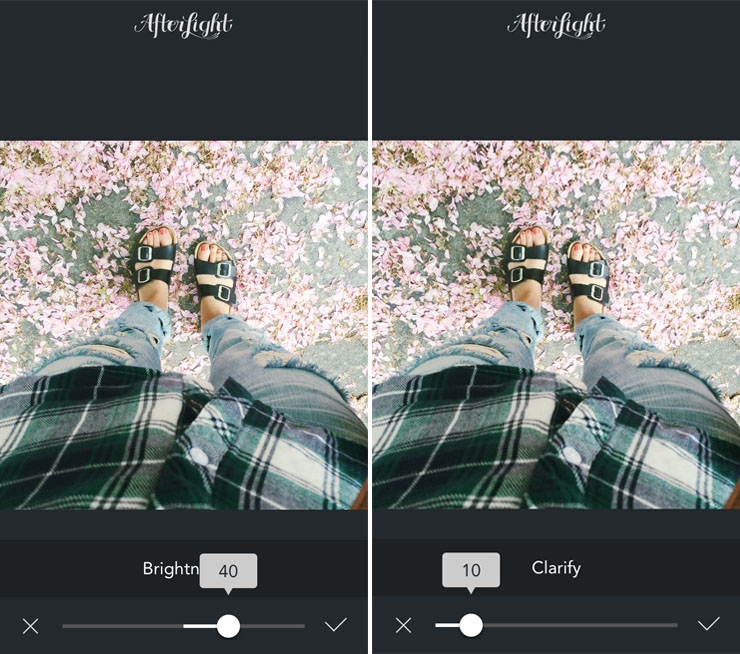
Step 4: Final Touches
Once I’ve finished all of the major edits, I’ll go back and see what I want to change. I usually increase the brightness a tad more. This can sometimes take away from some of the details in the photo, so I’ll also add a touch of clarity using the clarify tool.
And you’re done! Pretty right?

Let me know if you have any questions on what I did here in your comments!
rashawn Says
Thanks for this info. I was looking for an app like this. Very helpful
Katie Says
I’m loving your Blogging 101 posts (and the rest of this blog). You mention towards the beginning of this post on talking more about how to make the most of your Instagram account. It would be great to learn a little more on this topic. This post is really helpful.
Amanda Says
Post authorNoted! I’ll work on an Instagram focused post ASAP! xo
Christine Wan Says
Thank u for the great tips!! :D
Henry Grant Says
Hey everyone! If you’re looking to grow your brand on Instagram, I’ve got some tips for you. First, define your target audience and create content that resonates with them. Utilize hashtags strategically to reach a wider audience. Engage with your followers and build meaningful connections. And if you’re looking to boost your engagement, jesusmanifesto.com services can provide genuine likes and comments. Remember, it’s all about authenticity and building a strong brand presence. Happy branding on Instagram!
MaryMe Says
I like the idea of sharing Instagram-worthy spots in L.A.! The city is a treasure trove for stunning visuals. One personal favorite is the iconic Griffith Observatory – the views of the city are unparalleled. Another gem is the Arts District with its vibrant street art. By the way if you’re into sharing your experiences through a blog, consider boosting your visibility by buying reel views by this link. It’s a smart way to catch more eyes and connect with fellow enthusiasts!